Friday, December 17, 2010

Not just another iPad post

I've been contemplating for a few months now on what to write for a blog post on iPads/iPods in special education. I'm just never really sure if what I would write hasn't already been said. There are so many wonderful adoptions of these devices in the special education world. Last week an article was posted in the local newspaper about a student from our district who received an iPad as a Christmas gift through a Facebook voting contest. You can read the article here. This article inspired me. What is so wonderful about the iPad is how it breaks down technology barriers for some of our students. Having a touch screen interface takes away the challenges of using a mouse. With a touch screen native to the device, it takes away the awkward calibrations of placing a touchscreen on a laptop or desktop. The iPad allows people with disabilities to access technology without any modifications or adaptations. It allows them to be independent, to fit in, to use technology like everyone else.

I recently received these thoughts from a student via the QIAT listserve about the benefits of having an iPad:

1) Less space – I can have my textbook open and my ipad to take notes. When I used the computer, I had to have my aide take my notes because I couldn’t have both in front of me.

2) I can lift the IPAD myself. When I use the computer I have to have someone set it up for me. My IPAD can be tucked into the side of my chair and I can reach it.

3) Power – with my laptop I always had to be near an outlet or make sure the laptop was charged for the classes that didn’t have outlets. My IPAD is always ready to go.

4) Waiting – there is no waiting for windows to start. I slide the bar and I am ready to work.

5) Independent: because of my fatigue level often I tire out moving the mouse before I am done working. Now I can finish a worksheet because I don’t have to move as much as I did.

6) Enlarging – I don’t have to worry if the photocopier is down or my aide forgot to change font size, I can enlarge text by dragging the content and scrolling.

7) Dictionary at hand: All I have to do is tap on the word and my dictionary opens on the IPAD. In the past, I had to highlight the word, open IE and then go to dictionary.com and paste my word. Now it is one step instead of 4-5 steps.

8) Copy and pasting is two easy steps – highlight and copy comes right up. With the computer I need to use the mouse or the keyboard to highlight text, right click or go to edit to copy, open a second document to paste (edit paste or right click and paste), now I can paste to a clipboard within seconds instead of minutes.

9) Speed: I am faster. I am independent. I am the student I can be with the IPAD. With the computer I was a student. But I am not independent. I have to wait for someone to assist me. I worked three times as hard with ¼ of the result.

10) Games – on the laptop I wasn’t allowed games even though they support my memory and fine motor skills. With the IPAD I can have games that support my IEP goals. I need to increase speed of typing, speed of navigation practice makes perfect. Practice shouldn’t be boring.

The iPad is a tool with many resources. Before all of these resources were not available in one place. Now, the iPad puts them all neatly in one portable, shiny, accessible package. There are some things the iPad cannot do, but the benefits and independence it gives many of our students justifies the value for the iPad. It provides a technology that is accessible and engaging, as well as giving our students the independence they deserve.

Tuesday, September 14, 2010

AT in the Kitchen

I must admit, I'm a bit of a foodie. You can often find me watching Food Network on Saturday mornings, curled up with some homemade egg bake. Technology for cooking has come a long way since the early days of putting a hunk of meat on a stick over a fire. This leaves me to ponder if the technology is accessible for people with disabilities. Is there any of today's modern technology that is helpful to those with physical or developmental disabilities? Is there AT for the kitchen?

If you take a look at the Assistive and Instructional Technology Lab at the University of Texas at Austin, you will notice a section on kitchen items. These include large type timers, color coded measuring utensils, and jar openers.

Some other things to consider are larger handles for easier grip. Check out these two vegetable peelers.

The one on the right is going to be much easier to grip and maneuver with the large handled soft grip.

I happen to really like the idea that Rachael Ray has with her spoons. They are called "Lazy Spoons". The spoons have a notch on the side, so you can keep the spoon with the pot you are cooking without it falling to the floor. For those with low vision, cookbooks with large print have now become easier to locate. Even popular cookbooks like the "South Beach Diet" cookbook are available in large print.

To keep a recipe stable while cooking, a "page up" or a recipe book holder can be used. This keeps your hands free for cooking, and your recipe in a secure place.


Pictured on the left is a one-handed cutting board, which stabilizes the food while chopping.

There are also tools such as battery operated sifters, talking egg timers, and talking thermometers available.

Being able to be independent in the kitchen is so important. In schools, students are taught basic cooking skills to help foster their independence and teach them safety in the kitchen. With accessible kitchens and accessible cooking tools available, our students, friends, and family members with special needs can have more independence in their daily lives.

Let's get cooking!
-Amy


Tuesday, July 20, 2010

Social Media

My husband and I were recently having a discussion about social media. With his new job he has created a Twitter account and is learning the ins-and-outs of social networking advertising. He said he was impressed with my Twitter account and how I follow people and businesses that pertain to special education, education technology, and assistive technology. I got to thinking about how social media has impacted me. I have met many new colleagues, gained countless resources, and learned tons of new and up-to-date information. With Facebook hitting 500 million users this week (good time for a blog post on social media, right?), social media is impacting our society in a big way. But how, HOW, do we get this into the classroom? How can our students with special needs take on the monster that is social media? Well, some have already been doing it for quite awhile - and with great finesse.

Check this out: http://www.hpjh.blogspot.com/ The students at Highland Park Junior High School in St. Paul, Minnesota are using a blog to practice their writing skills. They are also using VoiceThread, Flickr Creative Commons, and many other Web 2.0 tools. They are communicating with ebuddies both on and off the blog.

Here is an article from Mashable offering 4 tips for social media in the classroom. http://mashable.com/2010/05/11/social-media-school/

Here is another article giving 100 ways to use social media in the classroom: http://www.onlineuniversities.com/blog/2010/05/100-inspiring-ways-to-use-social-media-in-the-classroom/

I could give you many more articles about advice and ways for using social media in your classroom, but the important part is to find out what works best for your students. Find out how many of your students are using social media. They may have some insight for you! Perhaps they can explain hashtags and the difference between TweetDeck and HootSuite. Maybe your students transitioning out of high school are already using TweetMyJobs to find post-secondary employment. If your students aren't social media savvy, then how about learning together? Explore the social media universe and bring it back to your students. Ask your technology integration staff for help, if need be.

Although social media may seem like a monster (roar!), what we need to remember is that social media is about connecting people. Connecting me to other assistive technology professionals, connecting car sales to their customers, connecting news to readers, connecting educators to other educators, connecting our transitioning students to jobs, and connecting our students with disabilities to the world.

Let's get connected.
-Amy

Tuesday, May 25, 2010

LocLine Modular Hose

Assistive Technology, it's part assistive, and part technology. Who would have ever thought it would also be part industrial? I have been thrilled with an assessment kit from LocLine Modular Hose which is flexible hose that can be mounted to a wheelchair for switch trials. The main purpose for this hose is for industrial use. Somehow along the way, assistive technology professionals saw it's potential. Now they have a kit specifically for AT use. I have quick attached the hose to my very own "wheelchair" so you can see how it works.


The hose is flexible, but stable. You can easily move it around, yet it won't bend back like a gooseneck mount can. You can also snap off a length of it to make it shorter, or pop it back on(with a little force) to make it longer. The kit comes with 3 feet of hose with a circular base. It also comes with Velcro coins and reusable zip ties. The kit is wonderful for AT evaluations, and trialing switch mount placements.


I hope you find this kit useful for your AT trials!

-Amy

Monday, May 17, 2010

Popsicle Sticks: A Simple and Versatile Low Tech Tool

Once upon a time, each of us probably made a Popsicle stick picture frame with lots of paint and glitter, and presented it to our moms and dads with grinning pride and joy. It was simple, and easy to make, and our parents pretended to love it.

Sometimes, in the fast paced technologically advanced world we live in, we forget about the simple tools that were once commonplace in the pre-technological classroom. Today, I am going to remind you of the simplest low tech tool of them all: the Popsicle stick. The Popsicle stick is versatile because, well, it's just a wooden stick. You can paint on it, color it, glue it, use it as a bookmark, use it to identify seeds planted, use it to practice tallies, use it to count, use it to stir things, use it as a pointer, and so on and so forth. I am going to share 3 examples with you that I learned from an Autism make-and-take workshop.

1) Follow with your eyes
Have you ever been reading aloud in a classroom, asked a student to follow with his eyes, and he puts his eyes on the book? Here is a solution to helping kids follow along in the book:
2) Asking too many questions
Some students ask many questions, or frequently ask to go to the bathroom. If this is the case, you can make Popsicle sticks with appropriate symbols. Give the student a set number of Popsicle sticks. When they ask a question or ask to go to the bathroom, they give you a Popsicle stick. When they run out of sticks, they cannot ask anymore questions or go to the bathroom anymore. The student will then learn how to space his or her questions out. You can also start to reduce the number of Popsicle sticks as time goes on.
3) Understanding parts of a story
Labeling Popsicle sticks with parts of a story (plot, character, conflict, resolution, setting, etc) will help students to focus on that particular area of the story. Give a student a Popsicle stick. Read the story aloud. When the story is over, the student will share what he or she found in the story related to the Popsicle stick they hold. The group can then discuss. Picture clues on the Popsicle stick will help the student remember what he or she is looking for.

If you have more great ideas for uses of Popsicle sticks in the classroom, please feel free to post below! I hope you find these ideas useful!

-Amy

Monday, May 10, 2010

Blog!

Great news! My friends at Indiana Assistive Technology Act Project (INDATA) have added my blog to the links on their blog. Check out the INDATA blog here: http://blog.eastersealstech.com/

So, if you folks from Indiana stumble across the link, and say "what is this blog from Fargo, ND doing on the INDATA blog?" The answer is this: Twitter.

Twitter has allowed me to social network with other Assistive Technology Professionals from all over the place. I guess the folks at INDATA liked what I was writing about, so they put the link up!

My goal for this blog is to share some AT tools that we are using here at West Fargo Public Schools. Some of these tools may not apply to you folks in Indiana, but I hope you are able to find some information that may help you to be more independent.

Thanks for reading! Stop by again sometime for some assistive technology tips and tools.

-Amy

Thursday, May 6, 2010

Virtual Math Manipulatives

Recently, I have had two wonderful websites shared with me filled with virtual manipulatives for mathematics. As a person who has struggled with math her entire life, I understand the need for these tools. Giving students the chance to visualize and manipulate math helps them better understand the problem. Numbers and symbols look like a new language. And, guess what? Math is a language. In order for our students to understand this language, we need to give them pictures and an opportunity to try it out.
The first site comes from Glencoe/McGraw Hill. You can select grade levels, background templates, and different manipulatives. My personal favorite is the Bears in a Boat for the Kindergarten level manipulatives. This also has some really nice drawing tools at the bottom of the screen.A second site is the National Library of Virtual Manipulatives. From this site, you can choose different math subjects for different age levels. For example, you can choose Number and Operations for grades 9-12, or Algebra for grades 3-5. There are excellent manipulatives in each category. Below is is the Geoboard under Geometry for grades 3-5. This provides challenges on the side for students to complete. I only wish it gave some feedback for correct or incorrect answers.


I encourage you to explore these sites. Hopefully you can find some useful tools to help instruct and guide your students through math!

-Amy

Monday, May 3, 2010

Speech Maker in Read and Write GOLD

I am always excited to learn about new features in Read and Write GOLD software. In our district, we have Read and Write GOLD at all of our upper level buildings, as well as single copies in each of our elementary schools. A great feature of this software is the "Speech Maker" tool. This tool allows you to turn text into an audio file (MP3). Simply pull up a word document and highlight the text you would like or highlight some text you would like from the web or a PDF. Then, click the speech maker button. This will ask you to choose the voice, where you would like to save, and what file type you would prefer (MP3 or WAV). Then, the text is scanned and converted to an audio state. If you have chosen the MP3 format, you can then put it on a student's MP3 player.
This tool is wonderful if you have students who benefit from that extra auditory help. For example, they could have their vocabulary words loaded onto their iPod, and listen to help them study for the test. They could also have their speech transformed into MP3. As they listen to it over and over while practicing, by the time speech day comes around - they will have their speech memorized!

I hope you will find this tool useful for your students!
-Amy

Friday, April 23, 2010

High Contrast in XP

I learned something new today from A.T.TIPSCAST! Left shift, left alt, and print screen turns on the high contrast feature in Windows XP. This also works in Windows 7, but shows up a little differently. Give it a try for your students with visual impairments or those who have trouble focusing. You may be surprised at the results!

One Button Mouse

As children are acquiring computer skills, they often struggle with learning how to use a standard two button mouse. The right click button is confusing, and sometimes takes them away from the place they intended to go. If there is a scroll button - forget about it! When I was first approached about a one button mouse, I went to Best Buy to see if they had any. They did not, so I assumed that they could not be found or did not exist other than on the Mac. So, I went to our technology department and asked for an old mouse I could adapt.

This is my result.

I was very pleased with my work, as the visual hand with the star was going to be successful in teaching the student how to left-click. Well, it works, but the adhesive I used was not strong enough and it comes undone.

So, when approached a second time about a one button mouse, I decided to do a little research. Voila! A one button mouse. The Chester Mouse. The Chester Mouse is very petite, has one button, and a cute little mouse logo on it. It was designed for small hands, and works excellent for students who are new to computers or have fine motor issues. The Chester Mouse can be purchased from Chester Creek as well as from many third party vendors.


-Amy

Wednesday, April 21, 2010

Accessible Blog

Great news!

My blog is now accessible, and all my posts can be read aloud. You can now also subscribe to my podcasts. This service is powered by odiogo.com. The only strange thing is, the voice is a man, so you'll just have to remember that a woman wrote the posts!

-Amy

Monday, April 19, 2010

AT Expo Recap

I had a fabulous time at the AT Expo! It was great to see so many faces. I met many new people - vendors, people with disabilities, parents, the aging population, and even a librarian! It is amazing how AT, once considered a very specialized field, really impacts everyone. One older couple I talked to said that they are determined to stay in their home as long as possible, and they were hoping to find some assistive technology to help them do just that. I also met a parent who thanked me for sending out the fliers to students because otherwise she would not have known about the Expo.

I also was part of helping Mark Coppin with his presentations on the iPod touch/iPad for special education. These sessions couldn't have come at a better time with the release of the iPad. The Wednesday session completely filled up, so Mark added a Friday session, which was also full! There are some wonderful resources to check out at this Ning site: http://ipods4specialneeds.ning.com/

At the West Fargo Schools booth, I was handing out flexible pencils. They were a HUGE hit! People kept coming up to my booth and saying, "Oh, THIS is where the cool pencils are coming from!" To me, it just made sense to give pencils - but I, of course, couldn't just give regular pencils. They had to be ASSISTIVE TECHNOLOGY pencils!

One thing I really wanted to discuss is the label maker I had on my table. People at first glance thought it was a communication device. When they looked closer - they noticed it was a label maker. They wondered why a label maker was on my table as AT. I explained that it helps students to organize their things, and for students with fine motor issues - they can use the label maker to print their answers and stick on fill-in-the blank worksheets and tests. People were really excited about those ideas! Something as ordinary as a label maker can be assistive technology, who knew? I presented a class a few weeks ago on AT, and I brought random household items (pizza cutter, lazy susan, magnetic chip clips, picture frame, kitchen drawer liner, etc) and had the attendees brainstorm how these items could be assistive technology. The responses were fantastic! This just shows that AT can be anything. It doesn't have to be fancy, sophisticated, and cost thousands of dollars, it just needs to be functional for the student.

In closing, the AT Expo was truly a success. My tweets ended up getting the news crew there - which was very exciting exposure for the event! I hope that you will share the great news of the Expo to your friends and family, and I hope to see you all there next year! www.atexpo.org

-Amy

Tuesday, April 13, 2010

AT Expo -It's here!!

After months of anticipation and planning, the AT Expo pre-conference is tomorrow! Mark Coppin from the Anne Carlsen Center will bet talking about iPod Touches and iPads in special education. I will play the role of Vanna White and help Mark out. This session filled up so fast, that he added a second full day session on the same topic for Friday. This, too, has already been filled up! The timing of this event is perfect with the release of the iPad and people are interested in bringing this tool into the classroom. With all the Apps available, the iPod touch can be so useful for our students. It also has the 'cool' factor, making everyone interested. As well as the great things Mark is presenting on, there are several educational sessions Thursday, the day of the conference. There is also the Metro Area Mayor's Council on Disabilities luncheon, as well as vendor booths. The exhibit hall is open from 11am-6pm Thursday and is free to the public. I encourage you to invite anyone you know who would benefit from assistive technology. From ages birth-120, there is a tool out there to meet everyone's needs.

For more information, please visit www.atexpo.org

I hope to see you there!

-Amy

Thursday, April 1, 2010

Readability


I have recently been sharing a simple, yet effective tool with my colleagues. It is called Readability. Don't let the name fool you, it does not analyze text to give you a grade level for which it is written. Instead, it takes any website you are trying to read and takes away all the clutter.

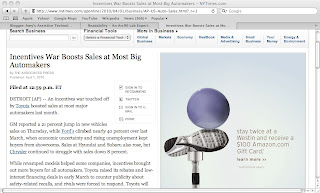
Here is me trying to read an article from the NY Times website. Note all the banners, buttons, and advertisements around the article.

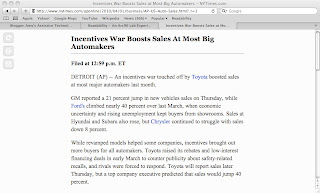
Here is what Readability does to the article:
As you can see, all the clutter is removed, and it is easier to focus on the article.

For students who are easily distracted, this is tool is helpful. To use Readability, go to the following link. http://lab.arc90.com/experiments/readability/
Change the settings to those that are preferred by the reader. Right click the Readability button, add to favorites. Or simply drag the Readability button up to your toolbar.
Go find an article to read, then click the Readability button on your toolbar or find it in your favorites. Then, like magic, the text is changed to the settings you picked out!

I hope this tool will help your students be successful and independent learners!

-Amy


Friday, March 26, 2010

AT Expo

I have had the wonderful experience of being able to be involved with the planning of the 7th annual Assistive Technology Expo in Fargo, ND. The Expo was started by a group of people who wanted to get the word out to North Dakota, Minnesota, and South Dakota residents that there is, in fact, Assistive Technology available in our area. They have experienced great success with over 500 people attending last year.

There will be approximately 60 vendors, all showing assistive technology that is available in our area. There will educational sessions in the morning, a luncheon with the Metro Area Mayor's Committee for People with Disabilities Awards Banquet, vendor booths, and support groups meeting in the afternoon. There will also be a concurrent self advocacy workshop.

The exhibit booths are free and open to the public. They will be open from 11am-6pm. The morning educational sessions qualify for Continuing Education Units. There is also a free orthopedic screening from the Shriner's.

I must also mention that there is a pre-conference workshop. This workshop however, has filled up! Mark Coppin of the Anne Carlsen Center is presenting on the iPod Touch as an Assistive Technology Tool. You can see why this is in popular demand!

The expo is held on April 15th, 2010 at the Ramada Plaza Suites in Fargo, ND. You can find out more information at: www.atexpo.org. I look forward to seeing you there!

-Amy

Thursday, March 25, 2010

LiveScribe Pulse Smart Pens

Have you heard the buzz about the new LiveScribe pens? They record audio while taking notes. The pen has an infrared camera that reads a special dot pattern on the paper. The pen matches the audio recording to the notes that are being taken. When the lecture/meeting/presentation is over, tap the notes to hear it again! Tap anywhere on the notes, and the pen remembers the audio from the spot. Check out the video at www.livescribe.com you have to see it to believe it!

These pens are a great assistive technology tool. Not only are they readily available (sold at Target and Best Buy), but they are reasonable priced. The 2GB model starts at about $150. The 2GB model holds 200 hours of recording time, and the 4GB model holds 400 hours of recording time. The notebooks cost about $7 each. The pen does require the specialized paper to work, however, the paper can be downloaded and printed from the website.

Besides the obvious use of eliminating a scribe for students, we are using these pens for students who need the accommodation of having tests read to them. Simply tear out a sheet of notebook paper, and run it through the printer to print the test on it. Before the scheduled test, use the pen to record the test for the student. The student sits in class with the pen and the headphones plugged in. The test is read to the student with out having to leave the class. The student can even increase or decrease the playback speed, so the question is read at a speed that he or she can easily follow. How wonderful is that?!

I have also seen examples of the pen being used for students as a communication device. Boardmaker symbols are printed onto the paper, and a teacher records the messages. The student uses the pen to tap the picture, and it is spoken.

I want to know, where were these pens when I was in college? Disability services at some colleges are switching from carbon copy notebooks to these pens, eliminating note takers for students! Hooray for independence!

-Amy